Inside The New York Botanical Garden
Sonia Uyterhoeven
Posted in Gardening Tips, Learning Experiences on March 23 2009, by Sonia Uyterhoeven
Larger than Life Space Savers: Growing Miniature Orchids in the Home
 Sonia Uyterhoeven is Gardener for Public Education at The New York Botanical Garden.
 If you have been visiting the Garden over the past few weeks and enjoying The Orchid Show, once you get into Shop in the Garden to “do some damage” you will be surrounded by many sweet smelling and wonderful hybrids that stretch upward to 4 feet and beyond with wonderful exotic sprays of flowers (Brassia, Oncidium, Ondontoglossum, and more).
If you don’t have space in your home for these gorgeous giants, there are many attractive miniature alternatives that are ideal for orchid growers of different experience levels, from beginner to advance.
We always think that bigger is better, but often in the confined quarters of our homes this is not the case. When you are thinking of growing plants on a windowsill or table, a diminutive-size plant not only does a better job of fitting the space but ends up creating a greater impact. Here are a few suggestions.
For several years now, the clone or cultivar Oncidium ‘Twinkle’ has been all the rage. To tell you that it is fragrant is an understatement. It exudes a strong, spicy vanilla fragrance that fills the air. This small orchid grows to about 12 inches tall with a full spray of white flowers. It is a cross between Oncidium cheirophorum and Oncidium ornithorynchum. There are a number of clones on the market, Oncidium ‘Twinkle Sharry Baby’ looks and smells like its larger parent (a scent of chocolate) but only reaches 6 inches tall.
Like other “dancing ladies,” these little orchids do well in medium to high levels of light. They will thrive in a southern or western exposure as long as the temperatures do not get too warm or the air too dry. One common mistake that people make with these orchids is overwatering. Miniature orchids grow in smaller pots that dry out faster and often need more frequent watering than orchids in larger pots. Remember, however, that many of the same rules apply. Oncidium like to approach dryness between watering; ‘Twinkle’, with its tiny roots, is no exception.
Encyclia have big, round pseudobulbs (swollen stems that hold water), which tells you right away that this orchid likes to get dry in between watering. This is an ideal orchid for the beginner who has bright light. Encyclia like intermediate to warm temperatures (average household temperatures) and are more forgiving of low humidity levels in the home.
Dendrochilum is a cool-looking orchid—the tiny flowers run down the spike to form a chain. This attribute is augmented by a sweet fragrance. They do well in a 3- to 6-inch pot with a fine fir bark mix or sphagnum moss. Water when the mix starts to dry and fertilize lightly on a regular basis. This orchid is happy with household temperatures and moderately bright light.
Cochleanthes and Masdevallia are good small choices for the more experienced orchid grower. Cochleanthes amazonica thrive in low levels of light (eastern or bright northern exposure) and intermediate temperatures. This orchid likes high levels of humidity (up to 70 percent), so it might be a good candidate for the aquarium or an enclosed case. The reward is a big flower on a small plant.
Masdevallia is known for its intoxicating, colorful blooms. It demands a relatively cool and humid environment to survive. These orchids do not posses a storage system, so they should not dry out. New Zealand sphagnum moss makes an excellent choice for potting media. A regular feed of a diluted fertilizer will keep this orchid healthy and flowering.
Posted in Gardening Tips on March 16 2009, by Sonia Uyterhoeven
Good Husbandry
Sonia Uyterhoeven is Gardener for Public Education at The New York Botanical Garden.
While good husbandry is an essential quality for any man, it is equally important for your plants. Now, what exactly is good husbandry some of you may be asking? For the former, I will wisely defer. As far as your plants are concerned, however, good husbandry essentially means good breeding practices. It is about selecting desirable qualities.
While I was in England last summer visiting the legendary garden Great Dixter, plantsman and designer Fergus Garrett spoke a great deal about good husbandry. It is important to do a little bit of research before you purchase a plant. Fergus pointed out that in some cases when you are choosing certain cultivars (cultivated varieties) you are making the choice between plants that will flower for 4 months versus 3 weeks.
Geranium ‘Johnson’s Blue’ is a good geranium and a former award winner, but it has now been superseded by the long-flowering Geranium ‘Rozanne’. In England a popular geranium is the longstanding Geranium ‘Ann Folkard’. A new addition to the market these days is Geranium ‘Ann Thompson’, whose magenta flowers last longer and are equally glorious.
It is not only about finding plants that flower well. There are other attributes to consider when choosing cultivars such as growth habit, the ability to form good seed heads and berries.
In terms of his selection of dahlias, Fergus looks for cultivars with a good, strong branch structure. He likes dahlias where he can simply stake the main stem and then secure strong lateral branches to the framework. Some of the favorite dahlias at Great Dixter are Dahlia ‘David Howard’, D. ‘Wittemans Superba’, and D. ‘Hillcrest Royal’.
If you are at a loss for choosing good cultivars for your garden and are searching for perennials that will not only perform well throughout the summer with their flowers but will also fade with dignity, form good seed heads, and maintain an attractive appearance, then come visit the Botanical Garden’s Seasonal Walk.
This year we had the famous Dutch designer Piet Oudolf team up with the Dutch bulb designer Jacqueline van der Kloet to create our seasonal display. This border will be full of many of Oudolf’s own introductions from his nursery in Hummelo, the Netherlands. It will include Echinacea ‘Fatal Attraction’, E. ‘Green Jewel’, and E. ‘Vintage Wine’ as well as Salvia ‘Eveline’.
Along with these Dutch introductions are stalwarts in our own nursery trade such as Astilbe ‘Visions in Pink’, Actaea ‘Brunette’, Helenium ‘Moerheim Beauty’, and many more. Bring your notepad and pencil and enjoy a stroll down Seasonal Walk for a wonderful educational experience. The bulbs will start the show early in the season and the perennials and ornamental grasses will take over during the course of the summer and close out the show in the fall.
Posted in Gardening Tips on March 9 2009, by Sonia Uyterhoeven
Sowing Seeds Indoors
Sonia Uyterhoeven is Gardener for Public Education at The New York Botanical Garden.
There are a number of advantages to starting your seeds indoors, among which is getting a jump on the growing season weeks before the last frost date (May 15 in New York City). Some vegetables take a long time to mature, and early sowing assures a good crop.
Starting from seed offers you a much wider selection than what you would find in already grown plants in a gardening center. Often, the more unusual and cherished varieties are only available in seed, and over the past decade, many more interesting ones, especially heirlooms, have become available.
I have many friends who like to trial heirloom tomatoes. Starting them from seed is easy and gives you more choices than you can possibly make in one season. Thumbing through the Seed Savers Exchange catalog is a great way to kindle your enthusiasm. I am personally interested in starting a basil trial and have been perusing Seeds of Change and Johnny’s Selected Seeds catalogs for inspiration.
These days, many seed companies are catering to our desire to “try a little bit of everything.” Besides the popular mesclun mix, companies now offer a variety of seed mixes such as “gourmet beet blend” and “gaggle of gourds,” which include a tasty and colorful assortment of heirlooms. Botanical Interests, Inc. is one such company that has a delightful selection of seeds.
Starting from seed is an incredibly cost efficient way to grow a large variety of herbs, flowers, and vegetables. The price of a seed packet is just a fraction of the cost of store-bought plants. Finally, it is simply rewarding to plant seeds and to watch them grow. Passionate gardeners and good cooks wait with anticipation as their summer harvest begins its seasonal cycle.
Sonia tells how to best sow seeds indoors, after the jump.
Read More
Posted in Gardening Tips on March 2 2009, by Sonia Uyterhoeven
Steaming Things Up: Growing Orchids in the Home
Sonia Uyterhoeven is Gardener for Public Education at The New York Botanical Garden.
 One of the challenges of growing orchids in the home is maintaining reasonably high humidity levels.
A drywell, while not the most effective antidote, is a common solution and one of the easiest for many houseplants. Creating one is as simple as filling a tray with a layer of pebbles and water and placing the orchid on top, making sure that the pot rests above the surface of the water. The water from the drywell will evaporate around the plants. Placing an oscillating fan so that it gently blows are over the surface will increase the evaporation.
Better yet is investing in a humidifier. The humidity levels in your home will drop down to 15–25 percent in winter; a good humidifier can raise that back up to 40 percent. This higher humidity level is good not only for orchids, but probably for your wintertime dry skin and the furniture as well. Of the many wonderful books on orchids, one of my personal favorites is William Cullina’s Understanding Orchids, which has an informative chapter on different types of humidifiers.
Some orchids, however, are more demanding and require levels of humidity that are unrealistic for most homeowners. Occasionally, I hear of people who successfully grow epiphytic orchids in slatted cedar baskets that dangle beneath a skylight in their bathroom. If you have the room and the inclination to shower with your orchids, then this is fine; but for most of us, that is not a viable option.
One solution is to begin collecting miniature orchids and grow them in an old aquarium. A friend of mine grows orchids this way and fits about four or five miniature orchids in a 15-gallon tank. Fill the aquarium with 2 inches of clean pebbles and add water to just beneath the top layer of pebbles. You are essentially creating an enclosed drywell for the plants.
Circulation is an important consideration for healthy orchids, so it is best to leave the top of the aquarium open. While this growing system increases the humidity, the enclosed case can overheat in the sun, so it is important to monitor the growing conditions.
Once all the variables are in place, you have an opportunity to experiment with growing a delightful array of miniature orchids. To create a display of different heights, turn over an empty terra-cotta pot and use it as a stand for your orchids. To learn more about this setup and for an accessible, no nonsense approach to growing orchids, refer to Ellen Zachos’ book Orchid Growing for Wimps.
Posted in Exhibitions, Gardening Tips, The Orchid Show on February 23 2009, by Sonia Uyterhoeven
Everything You Need to Care for Orchids Is in Cupboard
Sonia Uyterhoeven is Gardener for Public Education at The New York Botanical Garden.
 The best way to avoid or eliminate pest and disease problems when growing orchids in your home is to follow good cultural practices. Correct watering routines, consistent fertilizing, a good growing medium, proper light requirements, and adequate humidity levels are all essential to getting your exotic friends to thrive.
Sometimes, all that we do to take care of our orchids just isn’t enough. Let’s take a look as some user-friendly products that we have on hand to treat an ailing orchid. The first on the list is a grapefruit. If you notice that something is munching holes in the leaves of your orchid, but you just can’t find the culprit, then it’s probably a slug.
They nestle into the nice loose and moist pieces of your fir bark potting mix and wait until dark before they strike. These nocturnal creatures can do quite a bit of damage, so leave an overturned grapefruit or citrus rind in your pot. The slugs will crawl up into the damp cavity and you can then toss it out (slug and grapefruit rind) in the morning.
For other pest problems such as aphids, mealybugs, and scale try reaching into a household cupboard and pulling out the rubbing alcohol or the Murphy’s Oil Soap®. Dilute the Murphy’s Oil Soap® by adding 2–3 tablespoons to a quart of water. For scale, take a soft toothbrush or a cotton swab soaked with rubbing alcohol and rub off the scale.
Any new treatment should be tried first on one leaf or an isolated part of the plant to see how it is going to respond. Spray early in the morning or late in the day. Some sprays dry off quickly in the middle of the day and lose their potency and other times the combination of the spray and the intensity of the midday sun can burn the leaves. You will miss some insects the first time you spray, so repeat the treatment once a week for several weeks.
 If your orchids have black or brown spots that start to grow and look watery or mushy, then there is a good chance that it has a bacterial or fungal problem. Stick your hand back into the cupboard and grab the cinnamon—nature’s favorite natural fungicide. If possible, cut off the infected portion of leaf and sprinkle cinnamon over the area. If that is not available try Neosporin® applied with a cotton swab.
Posted in Gardening Tips on February 17 2009, by Sonia Uyterhoeven
The Cutting Edge
Sonia Uyterhoeven is Gardener for Public Education at The New York Botanical Garden.
It’s the time of the year to get outside and evaluate the pruning needs in your yard. February and March tend to be ideal times to prune, not all but many of your shrubs.
 How do you go about deciding what needs to be done? First of all, it is important that you get to know your plants. Some shrubs respond well when pruned back hard every year in winter to early spring. They produce vigorous new growth and more flowers. Classic examples are repeat-flowering roses (e.g. hybrid teas), butterfly bush (Buddleja), and blue mist shrub (Caryopteris), pictured at right.
Some shrubs such as Japanese andromeda (Pieris), rhododendrons (Rhododendron), and Carolina allspice (Calycanthus) need very little pruning. Other shrubs such as daphne (Daphne) resent pruning and will tell you.
Gardening often involves casualties, and this is just part of the process. Here are some basic guidelines for pruning shrubs and several tips to get you successfully through the season.
Start your pruning by cutting out all dead, damaged, and diseased branches. Then stand back and look at the shrub. Second, remove any branches that are crossing over, deciding which branches to remove and which ones should remain. Step back again and look at the shape that you are left with. You will be amazed at how little pruning you have to do on the majority of your shrubs once you have made these cuts.
Remember that a shrub is like a crowded subway. As long as everyone has their own personal space and enough room to breath, they are happy. Your woody plants are the same. Do not have branches competing for the same space, they will only be unhappy. New wood is more vigorous than old wood, but it is good to have a balance between both so that you have some character and structure along with the young new maverick branches (that tend to be more floriferous). Once you have grasped these concepts, pruning is then a matter of style and personal taste.
Additional tips:
- Never remove more than 20 percent of the growth unless you are rejuvenating a plant.
- Always use sharp, clean tools that are appropriate for the task.
- Shrubs that flower on current season’s growth can be pruned early in the season.
- Shrubs that flower early in the season or flower on old wood (last season’s growth) should be pruned immediately after flowering. Remember that there are always exceptions to the rule, and it is important to know your plant.
- Work with the natural shape of the plant to enhance its natural beauty and structure. This is very important. Working with the plant rather than against it will save you a lot of work.
- Error on the side of caution—if you are not sure about a cut, don’t do it.
Like every other aspect of gardening, have fun, make plenty of mistakes, and learn.
Posted in Gardening Tips on February 9 2009, by Sonia Uyterhoeven
Under or Inter…Planting?
Sonia Uyterhoeven is Gardener for Public Education at The New York Botanical Garden.
What are all these prefixes that we see hanging around the word “planting” and what exactly do they mean?
 Sometimes a photograph is worth a thousand words. At right is an example of underplanting at Great Dixter in England, the legendary garden of the late Christopher Lloyd.
Every nook and cranny is filled with plants. Microclimates are naturally created in the garden as taller plants cast shade on shorter plants. At Great Dixter, this is an opportunity for tapestry and texture; fuchsia, begonia, and other shade-loving plants hug the ground beneath taller plants. In the photo, Rolanda petasitis (velvet groundsel) will eventually shoot up to six feet tall, above the fuchsia and fern below.
If you follow the design principles of working with shape, texture, and contrast when combining the foliage and flowers of plants, with a little bit of practice you will start creating beautiful vignettes in your garden.
Interplanting requires a little more knowledge of your plants and their growth habits. Allium (ornamental onion) have beautiful orbicular-shaped flowers, but their foliage is something to be desired. The plant starts off in grand fashion and then starts to yellow before the flower has opened. At Great Dixter, ornamental onions are interplanted with the mounding foliage of hardy geranium such as Geranium ‘Ann Thompson’ and the loose framework of Spiraea x bumalda (bumald spirea).
 A good example of interplanting is seen at left, where the building block approach of Fergus Garrett, Great Dixter’s head gardener, is apparent. The foundation of this garden scene is the Pulmonaria (lungwort) that you see weaving through the border. Layers of plants are then added to the mix.
The hardy begonia (Begonia grandis ssp. evansiana) and jack-in-the-pulpit (Arisaema triphyllum) have a tendency to stretch and rise above their companions, adding a new spatial dimension through graduated heights that give a tiered or layered look. Strong shapes, textures, and color create a dynamism that makes it appear as if the plants are skipping through the border. Understanding how plants occupy space is a key element in this design.
Posted in Gardening Tips on February 2 2009, by Sonia Uyterhoeven
Garden Economics
Sonia Uyterhoeven is Gardener for Public Education at The New York Botanical Garden.
While many of us are thinking about curtailing our spending in this economic climate and talk of 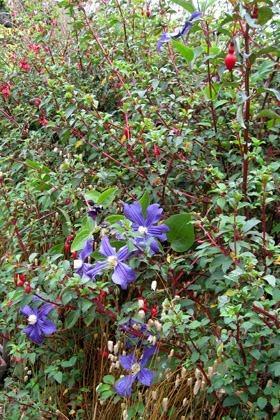 reduction seems more appropriate than expansion, for the plantaholic this could potentially be a sobering year. Fortunately for gardening enthusiasts, our good friends across the Atlantic always have some good advice to offer.
Last summer I spent some time over at the late Christopher Lloyd’s legendary garden, Great Dixter, in England learning from the garden’s life force, Fergus Garrett. Fergus is a marvelous combination of passionate plantsman, colorful and creative designer, and experienced educator who is able to communicate his vision.
During my visit he imparted many important design lessons that I will share with you in this and future blog posts. The gardens at Great Dixter are full; in fact they are exploding with plants arranged in a glorious display. Fergus is a big proponent of interplanting and underplanting. No space is wasted in this economical vision.
The question of any seasoned gardener who has undoubtedly experimented with cramming as many plants as possible into a limited space only to see the creation collapse is “How do you make it succeed?”
Fergus has a multi-layered approach to design. He creates his borders the same way you and I would put together a jigsaw puzzle. He works in a piecemeal way—starting with a few initial pieces and then building and slowly improving on the scene. In this design process, he is constantly exploring the seasonal dimension of the borders, the shapes involved, and the partnerships and interactions that are forming between the plants.
As an experienced plantsman, one key component in his design process is to understand and work with the space that plants need to thrive, either individually or in groups. In the example pictured here, he ingeniously works purple clematis into a hardy fuchsia (unfortunately, not hardy in New York).
The clematis benefits from the support of the lanky stems of the fuchsia, which allows it to climb through in an unhindered and happy fashion. The large, flat shape of the clematis contrasts beautifully with the small tubular flowers on the fuchsia. The design is completed with the color echo of the purple clematis and the dangling purple petals on the fuchsia, both dramatically offset by the fuchsia’s bright red sepals and stamens.
 As seen in the photo, the plants form what Fergus refers to as a happy union or marriage, where the plants bring out the best in each other and sustain or support each other as they grow. Next week we will explore his practice of layering plants in more detail.
Posted in Gardening Tips on January 26 2009, by Sonia Uyterhoeven
A Weedy Mess: Keeping My Life in Order
Sonia Uyterhoeven is Gardener for Public Education at The New York Botanical Garden.
I am always surprised by the long weekends we have in January and February. I seem to remember all the holidays except for the ones that sneak up in mid-winter. Since I never plan for them, they turn into three days of extended housecleaning. The piles on my desk diminish and bills finally get filed in the right place. During these moments, I swear to good housekeeping practices that I never abide by.
Gardening is much the same. If I abide by a few simple rules and good horticultural practices then I won’t find myself swamped with one big green, leafy mess. Today, I will focus on just one aspect of horticulture: good weeding practices. Here are a few simple tips to make weeding easier.
- Keep your garden a reasonable size: Don’t be over ambitious. Be honest about how much time you intend to spend in your garden and how much work it will take.
- Stagger your spring planting: Freshly cultivated soil is an invitation for weeds. If you plant your beds all at once, you will be weeding them at the same time. Stagger you planting over a few weeks.
- Low maintenance plants for the low maintenance gardener: If you don’t like weeding, choose plants that out-compete weeds. Select plants with broad foliage and heavy branching or ones that are large, tall, or vigorous growers. If the plant is doing its job of filling up the space, there will not be enough room or light for weeds to enter.
- Weed often: It’s important to weed often not only to keep weeds at bay, but also for your general health. If you try weeding your entire garden all at once, you will have sore muscles at the end of the day.
- Attack flowering weeds or weeds that are about to flower first: If you let weeds go to seed, you will have an uphill battle. Prioritize by removing flowering weeds first.
- Weed early in the season: Tiny weeds are easier to pull than big weeds. Early weeding also gives the plants you want in your garden a better chance of becoming established.
- Hoe when dry, hand when wet: If your soil is dry, run a hoe through your garden. Weeds exposed to hot sun without any water will shrivel up and die in no time. Rake off the debris. If you try using a hoe when your soil is wet, weeds will simply re-root. When your soil is wet is the time to tackle deep-rooted weeds like dandelions—they will be much easier to pull
.
Posted in Gardening Tips on January 20 2009, by Sonia Uyterhoeven
Easy Design Steps for the Home Gardener
Sonia Uyterhoeven is Gardener for Public Education at The New York Botanical Garden.
 A few years ago I designed a French kitchen garden (potagér). I was under a time constraint to come up with ideas, so I fell back on some good advice that I was given at the beginning of my career. “Why do things on your own when you can always solicit the help of others?” In terms of design, the easiest way to do this is to make use of a good library. Books are full of good ideas that can be borrowed and transposed into your own creations.
My initial task was to construct a framework for the garden. Raised beds provided a structure for much of the garden, but an extensive open area was up for grabs. Did I want an orderly, linear display in this area or flowing swaths of texture and color comprised of a conglomerate of herbs, flowers and vegetables?
 The answer was my typical “Let’s try a little of everything.” I found a wonderful illustration of a kitchen garden that contained tidy, linear rows that were separated in the middle with a bountiful oasis of flowers and herbs.
In the illustration an espalier of apples lined the sides of the middle expanse and acted as a transition from the linear vegetable rows to the free-flowing flowers. In my design I replaced the espaliers of apples with an espalier of tomatoes. This idea came from another book that described unusual ways to stake your tomatoes.
Once I had decided on the overall structure, the rest of the design quickly fell into place. Vegetables filled the raised beds, herbs and flowers spilled over the edges. Cute little ‘Tumbling Tom’ tomatoes spilled over the side of one bed lined by colorful ornamental peppers. With the structure in place, it was now a matter of selecting my choices from a myriad of vegetables and herbs.
Attention was paid to companion planting—potatoes joined peas in one bed, nasturtiums frolicked with tomatoes in another and rue snuggled up to a fig. Containers of sweet peas were supported by homemade teepees made from bamboo stakes. Marigolds skirted the sides in a hopeful attempt to ward off aphids.
Designing gardens, whether for vegetables or flowers, can be fun and easy. Borrowing ideas from other sources is a great way to start. Begin the process by staging your garden scene with a structure or a framework. Then carefully plug in the plants and any decorative elements.
Designs work best when you work with different layers—different heights, different shapes, different textures. To ensure that you do not end up with a cacophony of colors and textures, remember to apply the design principles of unity and repetition. A good design should form a coherent whole. Repetition of color, shapes, and textures are an easy way of creating a sense of continuity.
Winter is a wonderful time to sit down with design books and catalogs to start planning the gardening year ahead. Have fun.

 If you have been visiting the Garden over the past few weeks and enjoying The Orchid Show, once you get into Shop in the Garden to “do some damage” you will be surrounded by many sweet smelling and wonderful hybrids that stretch upward to 4 feet and beyond with wonderful exotic sprays of flowers (Brassia, Oncidium, Ondontoglossum, and more).