Table Top Monet
Posted in Gardening Tips on June 26 2012, by Matt Newman
Sonia Uyterhoeven is the NYBG‘s Gardener for Public Education.
 From time to time I teach flower arranging. It gives me the opportunity to play with color and exercise my artistic side. It is also rewarding to teach Garden visitors simple tips and techniques for producing colorful displays for their homes. With Monet’s Garden in full swing, I decided last weekend to focus on French floral arrangements.
I wasn’t terribly successful in uncovering the art of French floral design. It seemed like it’s become trendy to designate a floral design as being French, and I have had a hard time deciphering between those who were simply jumping on a marketing bandwagon and the true Francophiles.
I did discover a few sources that discussed the art of French floral design, however, and their bouquets and centerpieces were breathtaking. They were too elaborate for me to recreate, but they provided me with some principles that I could replicate in my simpler renditions.
One prominent feature of French floral design is a love of round floral bouquets–the bouquet rond. Round bouquets are fairly easy to make. They are often very successful when round flowers are used–flowers that have a cup-shape or flowers such as roses, peonies, daisies, sunflowers, and zinnias to name a few. These flowers mimic the shape of the bouquet and give it an effortless form.
An easy way to create a round bouquet is to hold either one or several of the flowers that you want for the center of the arrangement in your non-dominant hand. Hold the flowers by clasping them in between your thumb and index finger. You are basically making an O.K. sign with these two fingers. Slowly add flowers as you rotate the arrangement around.
The experts will tell you to arrange the flowers at a 25-degree angle, crossing the stems as you go to make a neat spiral. I, for one, have no visual sense of what a 25-degree angle looks like, so I improvise and it always seems to work. Make sure that the bouquet fits the vase–if it is too small it will lose its shape and, if too large, it will be crushed.
 Another tip I picked up from the French floral designers was to go out into the garden and fashion a bouquet that evokes a scene from the garden. I have done this before, but never thought of the bouquet as a rendering of the garden–just as a painting brings a garden scene to life.
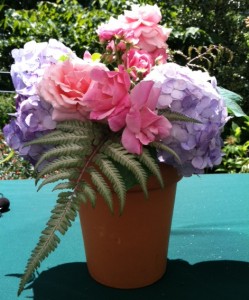
One of Monet’s favorite early summer color combinations was blue, purple, mauve, and pink. The color combination captured the colors of the morning mist rolling over his garden from the river Seine. I scouted the garden with this image in mind. The result was an arrangement which I aptly named ‘Le Jardin’.
I chose a tall terra cotta pot as the container. Since the pot had a drainage hole in the bottom, I placed a smaller vase inside that I then cushioned with newspaper so that it fit snugly. In the vase I tucked purple-blue hydrangeas, pink roses, silvery-blue hosta leaves and several fronds of a Japanese painted fern called ‘Ursula’s Red’. Some of the stems of the hosta leaves were long enough to reach the water, but were on the shorter side. I attached a small bamboo stake with wire to the stem to give them more stability.
When I pick flowers from the garden, I always take a bucket of water with me. Flowers last much longer when they go straight into a bucket of water, otherwise they get stressed and dehydrated. I often bring two buckets: one for short-stemmed foliage and flowers and a second for larger plant material. This way nothing gets crushed.
Large flowers and foliage are tempting but I usually opt for smaller leaves and flowers–they tend to be more in proportion with the designs that I do. Large flowers and foliage need a bold or large vase to stand up to them. When I cut flowers I make sure that I collect judiciously, collecting from all sides of the plant and, when possible, collecting from several different plants. This way nothing looks denuded when I have finished.
Once I head back inside, I condition the flowers by recutting the stems and placing them in a container with floral preservative. I then store them in a cool place for several hours before I make my arrangements. This gives them time to rehydrate and adjust to their new environment. A simple recipe for homemade floral preservative is: one teaspoon sugar, one teaspoon bleach, two teaspoons lemon juice and one quart lukewarm water. The sugar is food, the bleach disinfects, and the lemon juice acidifies the water and helps the flowers take it up.

A few items for the floral arranger’s checklist:
1. Cut flowers early in the morning. We get dehydrated during the middle of the day, and so do our flowers.
2.Cut stems at an angle so the surface area is larger.
3. Make sure no foliage in the vase is under water, otherwise bacteria will build up.
4. Change your water every other or every third day using floral preservative.
5. You don’t have to re-cut the stems every time you change the water unless you have roses, which do benefit from being re-cut.
6. If you want to use a container that is not water proof then place another container inside it.
7. I like to design with odd numbers–just as in garden design. Threes and fives are convenient numbers.
8. I like to place similar colors next to each other to bring out their tones and their personalities. I then like to create contrast by placing a color next to the duo that lies on the other side of the color wheel.
I will be teaching floral arrangements again in August and in October. Please check the Home Gardening calendar for dates and times. Until next week!


Hi:
Really enjoyed your article about French Floral Design and love the concept of a bouquet as a rendering of a garden design. What is so extra nice about the NYBG Monet Garden exhibit is the ever changing variety of blossoms and color palette. You take such care with protecting the flowers and your love of botany really shows….